
Need to add another IP address to your Linux CentOS 7 VPS or dedicated server? With Network Manager ‘nmtui‘ the process is fairly straightforward. Manual configuration is not recommended. However, it is still a viable option.
The nmtui Tool
The nmtui tool is the preferred way to bind additional IP addresses in CentOS 7. This is the text-based user interface, or TUI, that allows you to control NetworkManager.
Installing the nmtui Tool
CentOS versions predating 7.5 may not have the nmtui tool installed by default (packaged). The nmtui tool is a very helpful utility, and worth installing. Execute the following command:
sudo yum install NetworkManager-tui
Once installed, start the NetworkManager TUI:
sudo systemctl start NetworkManager
Using nmtui to Bind IPs
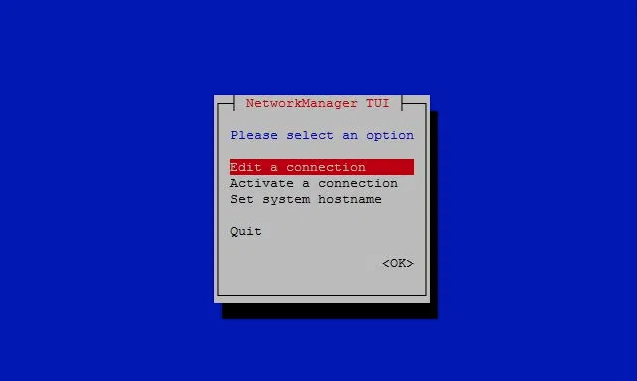
1. Open the Network Manager.
sudo nmtui
2. Select Edit a connection and press enter.
3. Use the arrow keys to select and Edit the existing interface (ens33 shown here).
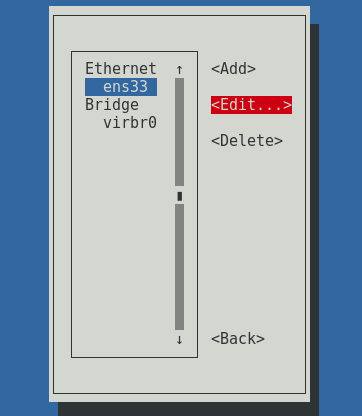
4. Tab down until Edit is highlighted. Press return.
5. Tab repeatedly on the next window to select IPv4 CONFIGURATION. Next press the enter key and choose the Manual option from the popup window. Then select the Show option. Press enter again to Remove or Add IP addresses.
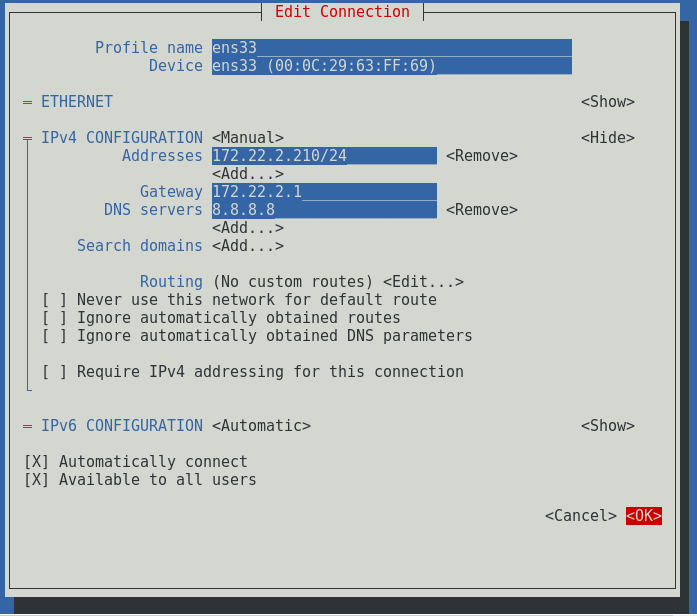
6. Select the Add option. Press the enter key. Input additional IP address(es).
7. Select OK to save the new configuration and bind your additional IP address(es).
Confirm that the IPs have been added by checking the configuration file /etc/sysconfig/network-scripts/ifcfg-ens33 (replacing “ens33” ):
$ cat /etc/sysconfig/network-scripts/ifcfg-ens33
...
# Alias on the interface
IPADDR1="192.168.0.1"
IPADDR2="192.168.1.2"
PREFIX1="32"
Alternatively, you can modify the text file instead of using nmtui, but nmtui is generally the easier option. Read more below.
Manual Configuration
The only instance in which you should use manual configuration is if your CentOS 7 interface doesn’t use Network Manager. This is rather rare, so you should confirm that your interface does, indeed, require manual configuration.
Confirm You Don’t Have Network Manager
$ grep 'NM_CONTROLLED' /etc/sysconfig/network-scripts/ifcfg-ens33
NM_CONTROLLED="no"
Note: Replace “ens33” with the name of your network interface card (NIC).
Manually Bind IPs
The next step is to edit the configuration file, which is located in /etc/sysconfig/network-scripts/. All configuration files start with the prefix “ifcfg-“. You can use this command to open up your interface’s config file (replacing “ens33” with the name of your network interface card, or “NIC”):
vi /etc/sysconfig/network-scripts/ifcfg-ens33
Your output will look similar to this:
TYPE="Ethernet"

BOOTPROTO="static"

NAME="ens33"

IPADDR="192.168.0.1"

UUID="113b3841-d06d-4a3c-89e8-1a49105a904a"

ONBOOT=yes

HWADDR="78:45:C4:17:FA:74"
For each additional IP address, you’ll want to add a new line below “IPADDR” titled “IPADDR1”, “IPADDR2”, and so on. Here’s an example:
TYPE="Ethernet"

BOOTPROTO="static"

NAME="ens33"

IPADDR="192.168.0.1"

IPADDR1="192.168.0.2"

UUID="113b3841-d06d-4a3c-89e8-1a49105a904a"

ONBOOT=yes
The final step is to restart your network so the changes take effect.
systemctl restart network
Now all of your IPs are bound to your CentOS 7 interface. You can test that the IP addresses have been added correctly by pinging them from another location.
Temporary IP Addresses
If you only need to bind the IP address temporarily, you can use the “ip” command.
$ ip a add 192.168.0.2 dev eth0
The IP above will work until you reboot the server or restart network service.
This method is simple, but it’s only ideal in certain situations. If you want to add a second IP or alias for long-term use, go with manual configuration or the nmtui.