
Introduction to Playlists
Playlists in Centova Cast provide convenient groupings of tracks and control exactly how and when those tracks will be played on your broadcast.
Different Types of Playlists
Four playlist types are currently available:
- General Rotation
General rotation playlists are the most common type of playlist, used to play a random selection of media from your library when no other, more specialized playlists are due to be played. - Scheduled
Scheduled playlists are used for scheduled broadcasts such as daily countdowns, “top 10” lists, pre-recorded shows, and similar content. - Interval
Interval playlists are used for station identification, advertisements, and other similar repeating content that needs to be played every few minutes or after every few tracks. - Immediate
Immediate playlists allow tracks to be queued for immediate playback, and are useful for on-the-fly content such as song requests or special announcements.
Creating New Playlists
Below we explain how to create a new playlist for your radio station.
How to create a playlist
- In the Centova navigation panel at the left-hand side of the screen, click
Playlistsunder the AutoDJ heading. - Click the
Create playlistlink at the right-hand side of the page. - Enter a title for your playlist in the Title field. This is informational only, so choose a title that is descriptive and has meaning to you.
- Choose a playlist type. Consult the previous section, Understanding Playlists for more information about the purpose of each playlist type.
- Configure the remaining settings as appropriate based on the playlist type you chose in step 4.
Adding Songs To Playlists
Here we explain how to add your audio/media to a basic playlist for broadcasting on your station.
Add media to a playlist
- In the Centova navigation panel at the left-hand side of the screen, click
Mediaunder the AutoDJ heading. The Media Library interface should appear, and you should see the artists of the tracks you uploaded to Auto DJ in the center pane. - Click on one of your artists and hold down the mouse button to drag it into the default Standard Rotation playlist on the left-hand side of the page. This will add all tracks by the selected artist to the playlist.
- If you prefer to add individual tracks instead of entire artists, you may optionally click on the artist, then click on one of the artist’s albums, and then drag the individual tracks into the Standard Rotation playlist instead.
- Repeat steps 2 and/or 3 for each of your artists, albums, and tracks. Note that you can also hold the
Ctrlkey while clicking the artists, albums, or tracks to select more than one at once, and then click and drag them all at the same time.
When you have finished adding audio files to the playlist, click the Return button at the bottom of the page to leave the Playlist Manager.
NOTE: When adding media files to a playlist, the changes are saved instantly as soon as you drop the tracks into the playlist, so no further saving is necessary.
General Rotation
General rotation playlists are fairly self-explanatory for the most part. Here you can choose between a random shuffle or sequential playback order.
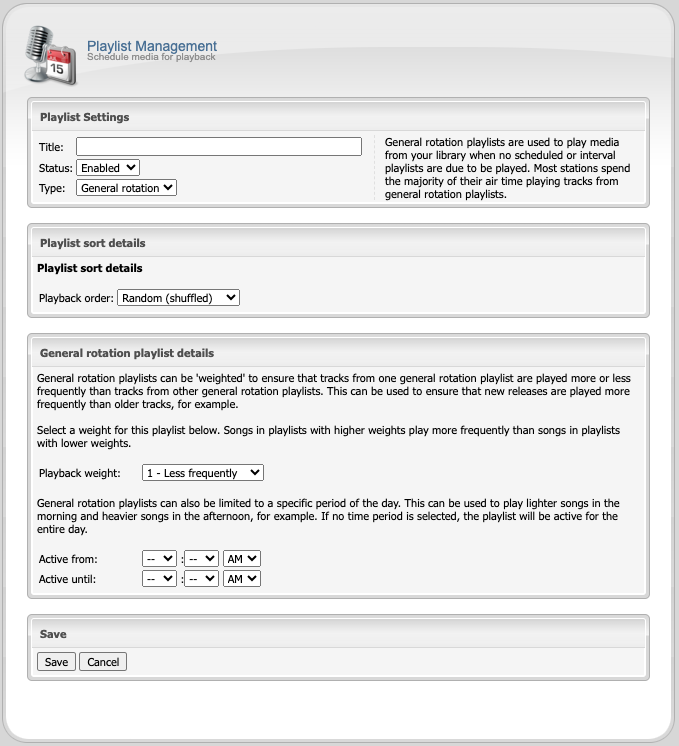
Weighting Playlists
When creating a General Rotation playlist, the most important option is the Playback weight. The weight controls how often tracks from this playlist are played relative to tracks from other General Rotation playlists; tracks from a playlist with a higher weight will be played more frequently than tracks from a playlist with a lower weight. You can use this to ensure that, for example, new releases (in one playlist) are played more frequently than older tracks (in another playlist).
Example
As an example, let’s assume you want to set up your station to play ten (10) “top 40” tracks per hour, four (4) “classic” tracks per hour, and one (1) “oldies” track per hour, on average. To accomplish this, you might create the following three playlists:
Top 40             Weight: 10
Classic            Weight: 4
Oldies             Weight: 1
With this configuration, regardless of the number of tracks in each playlist, the selection of tracks played from each playlist will always match the weighting you have configured.
NOTE: While the above example is based upon fifteen tracks per hour, “weighting” is actually just a relative measure used to indicate how often you want each playlist played relative to the others.
Scheduled Playlists
Nearly all radio broadcasters will incorporate some kind of scheduled programming — weekly countdowns, “top 10” lists, or pre-recorded content to be aired at a specific date or time. The Scheduled playlist type allows you to schedule these shows in advance and have them play automatically at the appropriate date(s) and time(s).
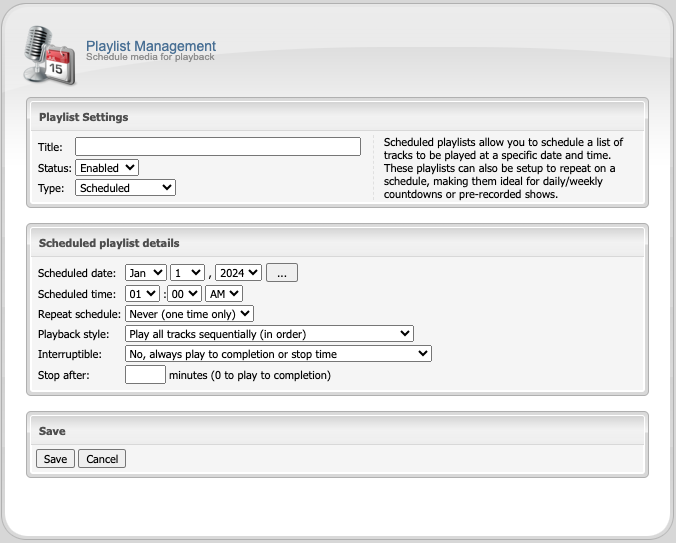
Single Playback
A single-playback scheduled playlist will activate on a specific date at a specific time, play to completion, and then disable itself (and never play again).
You can configure a single-playback playlist by creating a new playlist, then:
- Set the playlist type to
Scheduled. - Select a date and time using the Scheduled date and Scheduled time fields.
- Leave the Repeat schedule option set to
Never (one time only). - Click the
Savebutton to save the playlist.
Repeating Schedules
A scheduled playlist with a repeating schedule will activate at a specific time on specific day(s) of the week, month, or year. Each time the playlist activates, it will play to completion before going dormant and waiting for the next activation.
You can configure a repeating schedule by creating a new playlist, then:
- Set the playlist type to
Scheduled. - Select the date and time for the first activation of the playlist using the Scheduled date and Scheduled time fields.
- Use the Repeat schedule option to select the interval at which you would like the playlist to repeat.
- Daily – playlists activate every day at the specified time, starting on the date you select.
- Weekly – playlists activate on the days of the week you specify (Sun-Sat) at the specified time, starting on the date you select.
- Monthly – playlists activate each month, either on the day of the month you select or on the first or last day of the month, at the specified time, starting on the date you select.
- Yearly – playlists activate every year at the date and time you selected.
- Click the
Savebutton to save the scheduled playlist.
NOTE: Scheduled playlists are based on the server’s locale. Set your server timezone under General Settings inside Centova.
Interval Playlists
Most broadcasts include some type of advertising at regular intervals, ranging from sponsored advertisements to simple station identification call signs or “jingle” tracks. The Interval playlist type allows you to automate the inclusion of such advertisements into your stream at regular intervals.
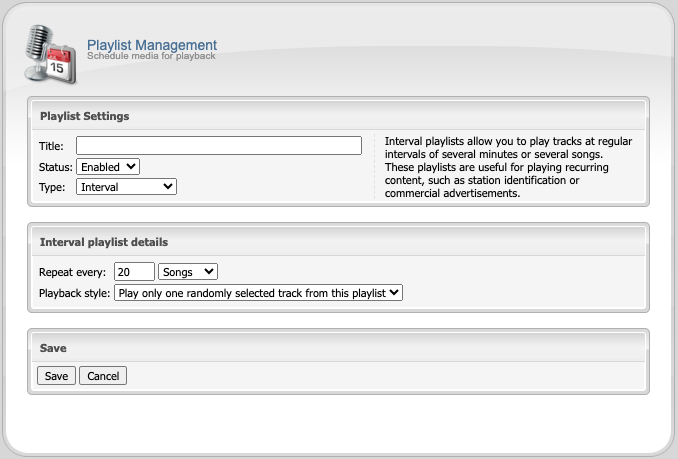
Configuring Interval Playlists
You can configure an interval playlist by creating a new playlist, then:
- Set the playlist type to
Interval. - Use the Repeat every field to select a repeat interval. You may choose to have the playlist repeat after a certain number of songs, or after a certain number of minutes.
- Click the
Savebutton to save the interval playlist. - Add media to the playlist.
Immediate Playlists
Most broadcasts include some type of advertising at regular intervals, ranging from sponsored advertisements to simple station identification call signs or “jingle” tracks. The Interval playlist type allows you to automate the inclusion of such advertisements into your stream at regular intervals.
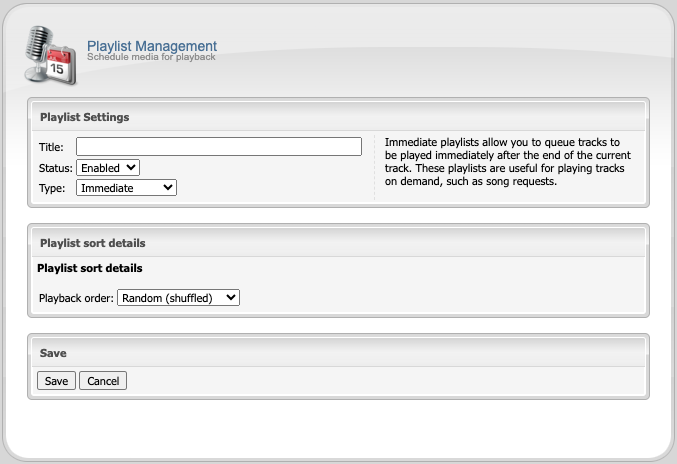
Configuring Immediate Playlists
You can configure an interval playlist by creating a new playlist, then:
- Set the playlist type to
Immediate. - Use the Playlist sort details field to select a playback order (random shuffled or sequential in order).
- Click the
Savebutton to save the immediate playlist. - Add media to the playlist.